
Adbfire, now also known as adblink is a software with which you can manage multiple kodi devices with a single PC. It is currently available for Windows, OS X and Linux. Adblink comes with loads of features. With adblink one can easily install kodi on multiple devices. Additionally, it facilitates to take backup, restore them, install apks directly on kodi devices and much more. Let me discuss all the features of adbfire / adblink below.
Contents
Features of adbfire / adblink:
1.Install kodi
With the help of adblink we can easily install kodi with a one click on various devices like firestick, chromecast, chromebook, etc… Not only installation, it even allows us to manage multiple devices with a single PC. All we need is to make an initial connection at first. Once it’s done all other things are damn easy. In this article we will explain the exact steps to install kodi on firestick using adbfire/ adblink.
2. Backup
adblink comes with an option to backup all your valuable data. All you need to do is, select the device that is connected and click on backup. The backup file will be stored safety on your system. You can also upload it and save them on cloud for safety purpose.
It really does not matter whether you want to stream movies or sports matches, kodi is best for this purpose.
3. Restore
Restore is a handy feature provided by adblink. With this option, you can easily restore the backup file which you have saved before. Say for example, if you have 2 or more devices and you want the same set of data to be loaded in all the devices, then you can easily restore them with adblink.
4. Edit cache
When it comes to streaming, cache is an important factor to be considered. Because of cache issues, one would end up in kodi buffering problems. So it is always necessary to clear the cache on kodi. You can do this, by simple clicking on the edit cache button.
5. Manage multiple devices
If you have got multiple kodi devices on your home then you need not worry about the setup. With adblink you can configure all the devices at once easily. Once you have added the device and connected it, you are all set to go. It can manage either with USB or via IP address.
6. File manager
With the help of file manager, one can easily edit the source files to make the most out of it. It will also be helpful to manage the storage.
7. Manage APK
You can easily install or uninstall apk files on your kodi device with the help of adblink. Just browse the apk file and click install.
8. Connect peripherals
It’s very easy to configure your keyboard or gaming console to your kodi device by select Console or keyboard option in adbfire/ adblink.
Hope these features are enough to explain about adbfire. Let’s now take a practical example of installing kodi on firestick using adbfire.
adbfire download
Before you can do anything with adblink, it’s necessary to download the adblink software for your platform. Download the software from the links below.
Once you have downloaded, just tap on the setup and click on next button to complete the installation. Once it’s over, just open the adblink. A new window will open up which will be something similar to the one below.

How to install kodi on firestick using adbfire / adblink?
So I assume that you have installed adbfire on your PC. Now it’s time to make the initial setup of firestick.
1.Directly plug the firestick into the HDMI port of your television. Then provide the power supply to it.
2. Follow the instructions given by the television and connect it to the local wifi network.
3. Register your firestick device on amazon. If you have already registered, you may skip this step.
4. Now connect both the firestick and computer to the same wifi network.
5. Then open the adblink software which you have installed before.
6. To install kodi on firestick, we need to download the kodi ARM apk file.
7. Save the file on your PC.
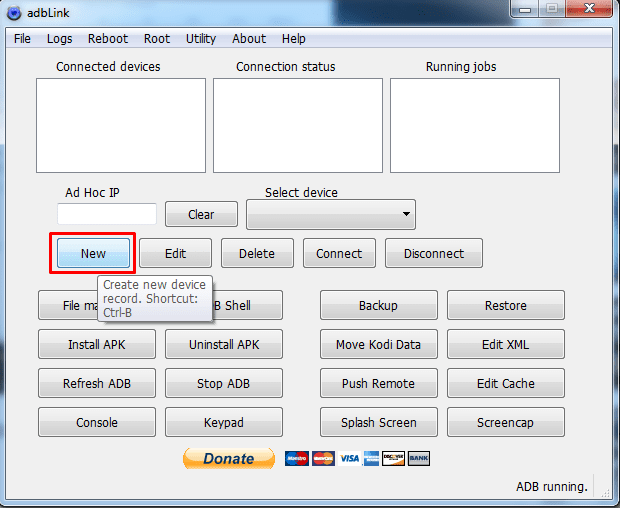
8. Now get back to Adblink. Now it’s time to add the device.
9. Click on new option as shown in the image.
10. Now a new window will open. There under Description enter the name of device for reference. Then under Address enter the IP of your firestick connection. Under media center, select Kodi.
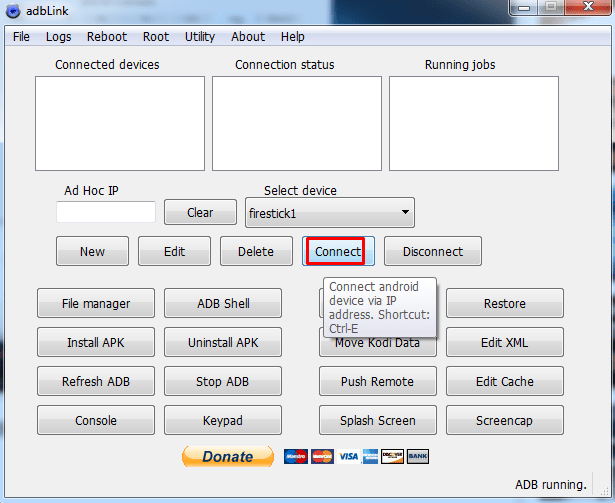
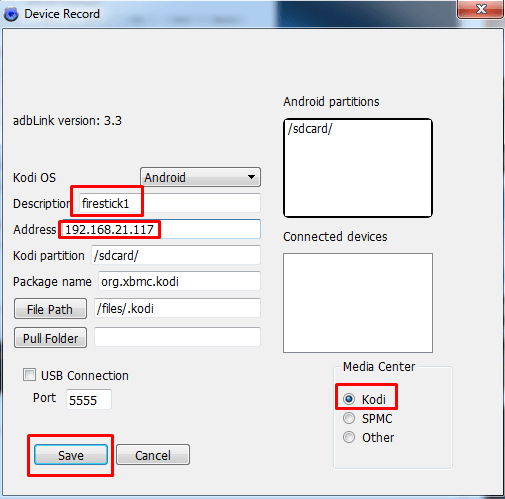 11. Finally, click on Save button. Now click on Connect button. Wait for sometime and check the Connected devices box. You will find the device and you can also test the connection status from it.
12. The step is to install apk which we have downloaded.
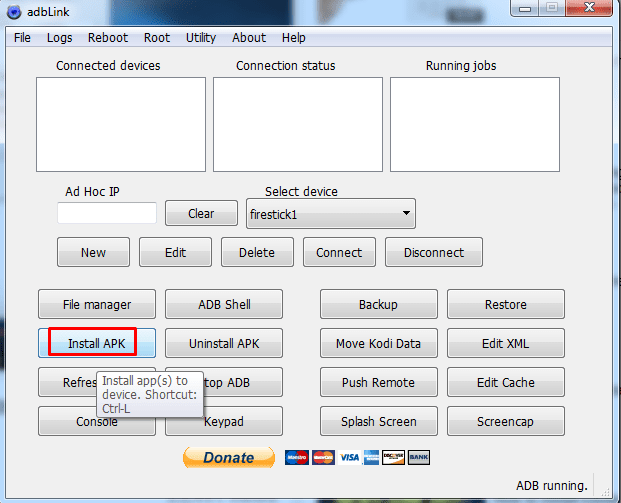
13. Now you gotto select the apk which you have downloaded. Once done, it will take few minutes to complete the installation. You can find the progress of installtion from the green line below.
That’s about the installation of firestick with adblink. Similarly you can repeat the same for other devices too.
Apart from these there are a lot more features which you can enjoy with adblink. Feel free to comment in case of any queries.