DRAGON STREAMS ADDON FOR KODI
Dragon stream is one of the best and smooth video add-on for Kodi. This add-on can be used to view things like live sports especially. Though it is mainly focusing on live sports, we can also utilize it for viewing live Television channels of almost every region of the World. The key regional TV channels include the US, European, and Asian TV channels.
Apart from these things, the repository of it (Torrent Release) contains Sportsdevil and YIFI Movies HD too. Dragon streams add-on contains the links of various Television channels like digital sports and more. This article is going to help you about the things like how to install Dragon streams add-on to kodi and how to use it after installation. It is one of the nice add-ons you can use it for entertaining yourself and the people around you.
HOW TO INSTALL DRAGON STREAM ADDON ON KODI
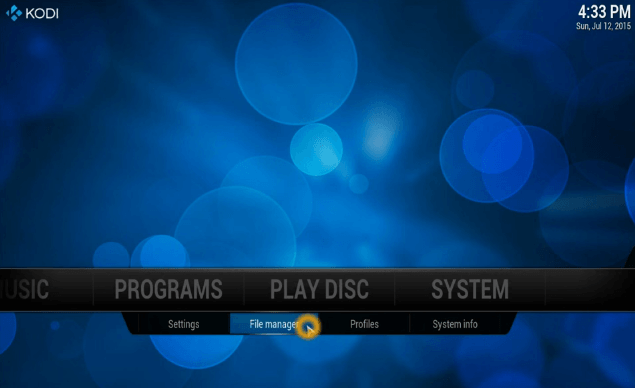
- The initial step has to be started from the home screen of kodi. In the home screen of kodi, you can see many tabs which include videos, movies, programs, music, and much more. In these options, navigate to SYSTEM tab and click on it. This process will open up the integrated options like Settings, File Manager, and two more. In these, you have to click on the File Manager.
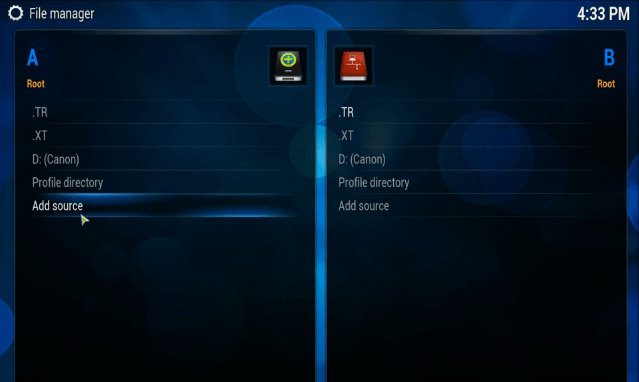
- Clicking on the File Manager option will open up the page as if illustrated above. In this page, you have to go to the option called “Add source” and click on it.
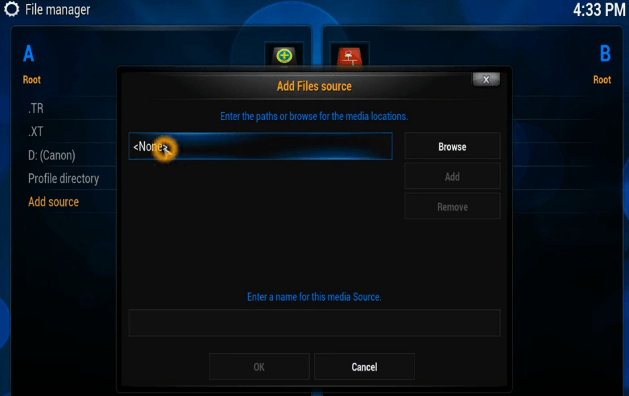
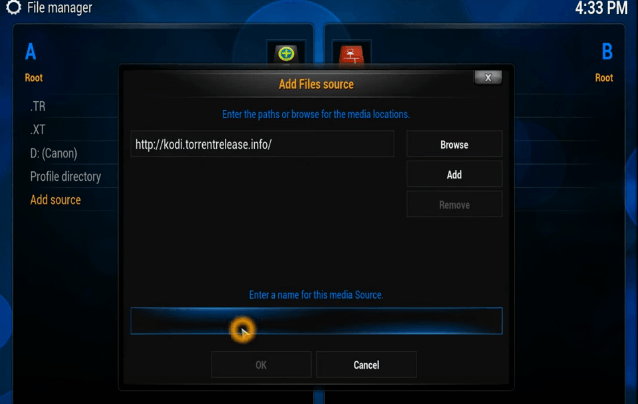
- Once you click on the Add source option, it will open a dialog box to enter the file source. In that, click on the first text field box with default content <None>. This space is provided for entering the path for media location.
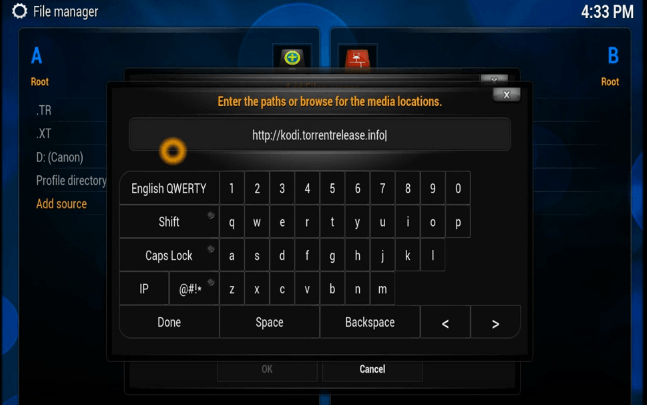
- Once you click on <None>, it will open up a box with Virtual Keypad further. In that, you have to type the media location link. You have to just enter the link http://kodi.torrentrelease.info in the space provided. After you enter the link, click on the DONE button at the bottom.
- After providing the media location link, next, you have to navigate to the text space provided for giving the name of the media source. Once you navigate to it, just click on it.
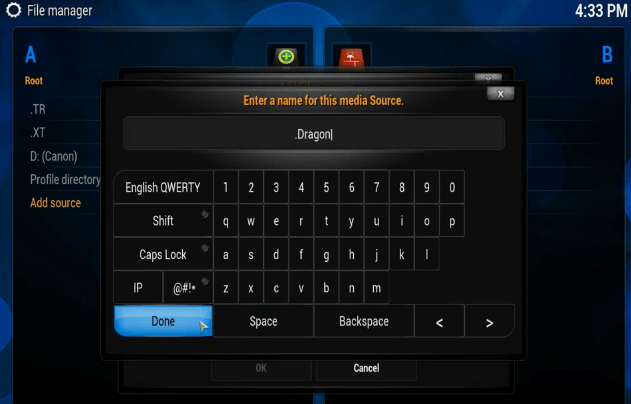
- Once you click on that space provided, it will exhibit the Virtual Keypad for typing the name. You can name the media source according to your wish. Here, we are naming the media source as “.Dragon.” After typing the name, click on the DONE button as if you clicked in the previous step.
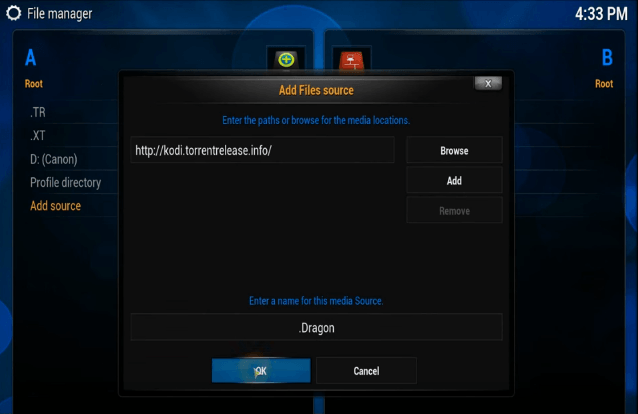
- The dialog box would look like the one which is shown in the above image after you enter both the path of media location and the name of it. After verifying the details, you have to click on the OK button provided below.
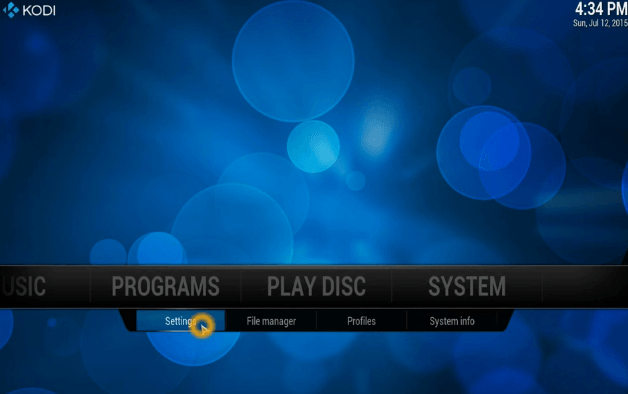
- After adding the source to kodi, you have to back to the home screen of Kodi. In the home screen, once again click on the SYSTEM tab and navigate to the integrated option “SETTINGS.” Once reaching the option, just click on it to open that thing.
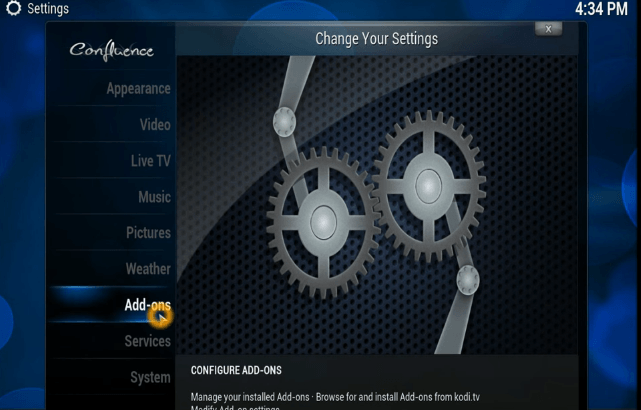
- Once you click to open the settings option in the system tab, you will get the page as if shown in the mentioned image. This page contains a list of options placed on the left side of the screen. In these options, go to the Add-ons and click it to open.
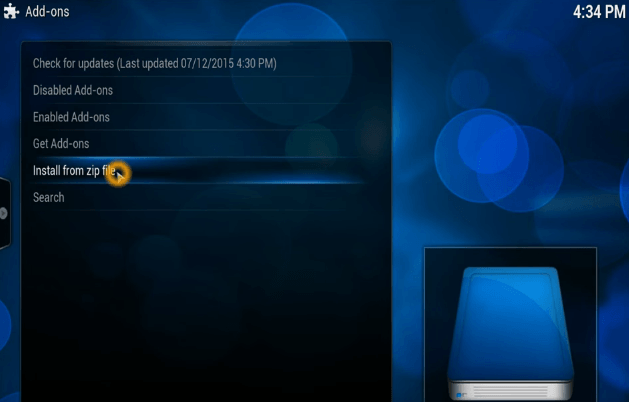
- Opening the Add-ons option will give out a screen as if shown in the above image. This page is the Add-ons page. This page too has list options in it. In those options, navigate to “Install from zip file” and just click on it.
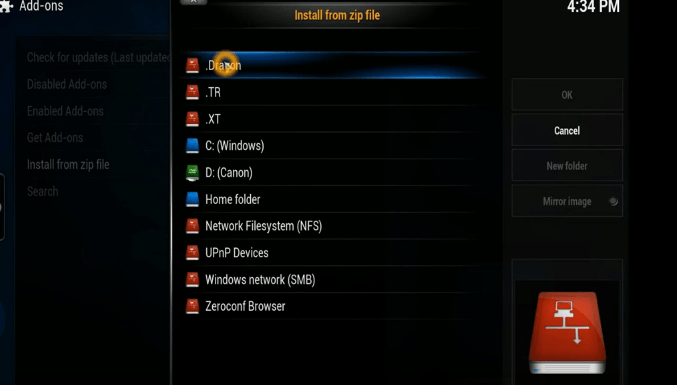
- The “Install from zip file” folder would have the media source which we have created in the previous step. This folder would contain the folder with the name which you have assigned before. As we have given “.Dragon” as the name, we can see this folder in this box. Just go on to it and click that to open.
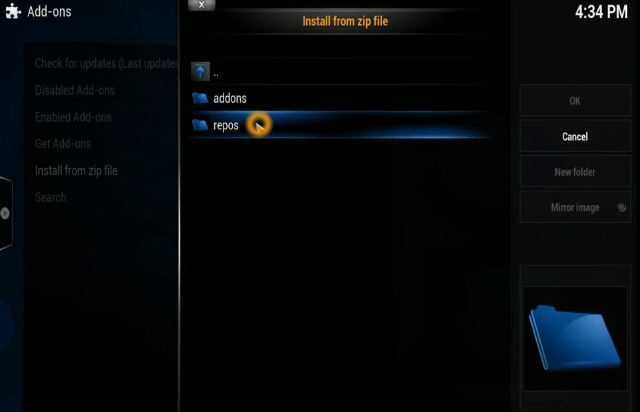
- Once you open that folder, we could see two folders with the names addons and repos. In these two, just click on the repos folder to open that thing.
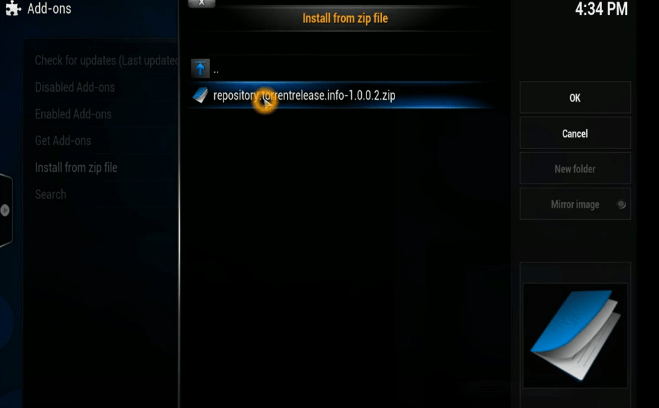
- After you open the repos folder, you can see the screen as if the one shown above. You could see the ZIP file with the name “repository.torrentrelease.info-1.0.0.2.zip” which is the one that you have to click on to open.
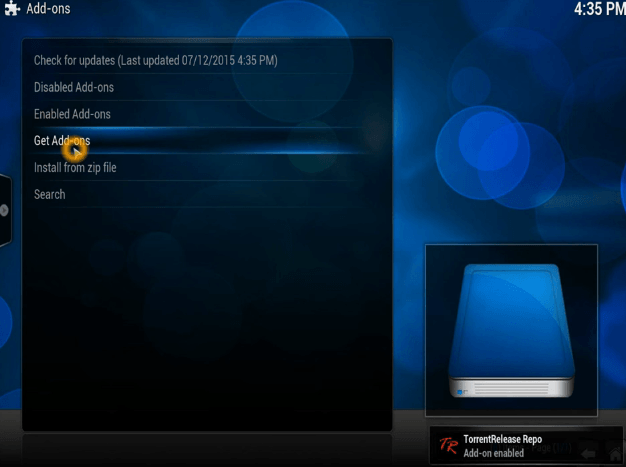
- Once you clicked the ZIP file “repository.torrentrelease.info-1.0.0.2.zip” the torrents release repository will get added in few seconds. Once added, you can see a pop-up message at the right bottom of the screen. This thing means the repository is ready.
- Once you see the Pop-up message, go to GET ADD-ONS option which you can find the Add-ons page. After navigating to that option, just click on it.
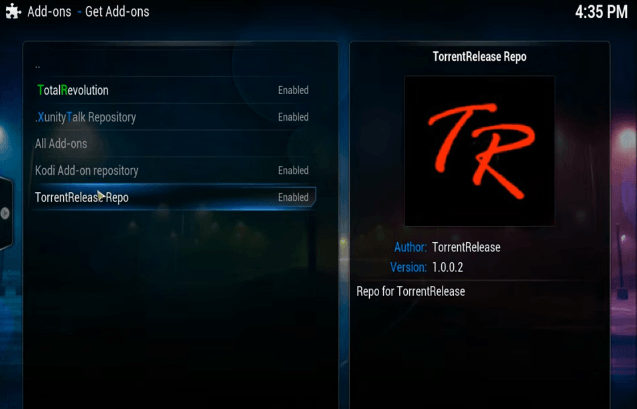
- After clicking on the Get Add-ons option, it will open up the screen as if shown in the above image. It would have many options like all add-ons, kodi add-ons repository and more. In this, you have to select the TorrentsReleaseRepo application file and click on it.
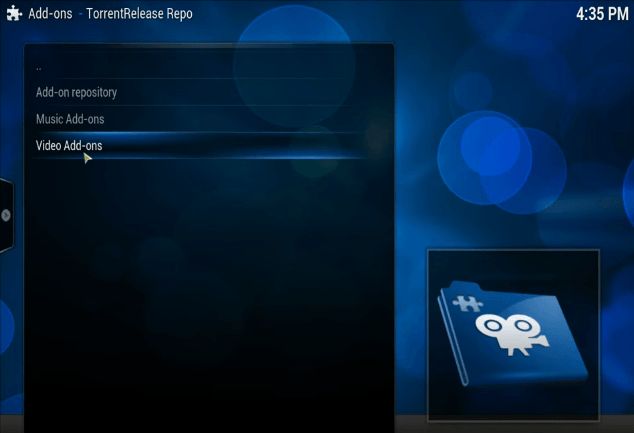
- Inside the TorrentsReleaseRepo you can see options like Add-on repository, music add-ons, and video add-ons. You have to click on the video add-ons option for the further process.
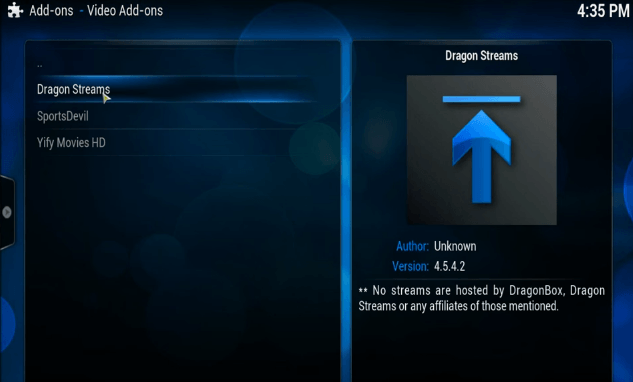
- Once you open the video add-ons option, you can see some of the video add-ons in it. It includes Dragon Streams, SportsDevil, and YIFY Movies HD. In these options click on the Dragon streams add-on for installing it to the Kodi.
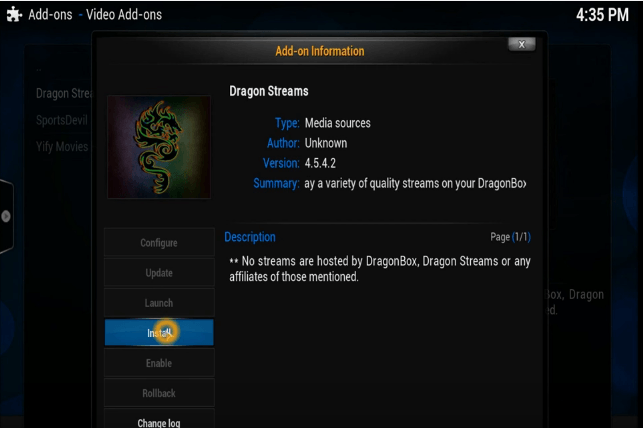
- Once you click on the Dragon streams add-on file, it will open up the installation page of that add-on. It would look as if shown in the above image. In this page, you can see an option called INSTALL in the left side of the screen. Just click on that for installing this add-on kodi.
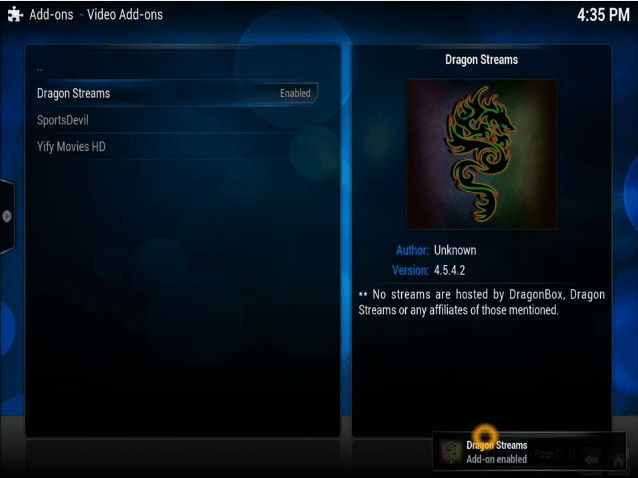
- The installation process may take a very few second to get completed. Once finished, you can see a pop-up message at the right bottom of the screen mentioned the add-on is enabled.
- Thus the installation process is over. For using this add-on, you can go to the videos tab and choose the add-ons for opening the dragon stream add-on. If you frequently use this add-on, you may get the icon on the home screen itself. You can open this thing and view live sports and live channels of almost every region of the world.
Wrapping Up
The above are the detailed steps which you need to keep in mind for installing and using the Dragon streams add-on. The steps are to be followed to get the stuff done clearly without any problem. For better installation, you can clean the data before you start the process of installation. Kodi and Dragon streams add-on is the best combination for viewing a lot of live sports and live TV channels too. Hope this is helpful for you all. Enjoy Kodi and stuff.


Help! I follow all the instructions up to going to the add on and click on the “Dragon” file where it’s supposed to say addons and repos to click on repos. This folder is empty! What do I do?
Same it’s empty for me too…